Wednesday, April 7, 2010
How to Look Like a Dragon!
To reference this makeup idea, I was a big fan of the Disney Classic Sleeping Beauty and I was always mystified by the way Maleficent was always featured in Purple and Black, and for quite some time, I spent the majority of my High School years emulating that style idea! I loved the idea of wearing purple and Black, and I loved the idea of using purple as a highlighting color, just the same way they used it for Maleficent! She was and probably is, the most evil character that Disney has ever produced, and I will always prefer her over the princesses...that's just me though!
Now, when I set out to think of a makeup idea for this movie, I went straight to Maleficent's Dragon. This was a bad ass dragon who did great evil things, and she was also a bad ass fairy! So off I went to my makeup box filled with Sephora, Urban Decay and Lime Crime Goodies, and I started messing with the whole of my box until I found the perfect color combination, and came out with this:
Makeup Used:
Eyes: Urban Decay Primer Potion, Lime Crime's Magic Eye Dusts in Empress and Medusa, Hot Topic Eye Liner in Black
Lips: Lime Crime's Lipstick in Airborne Unicorn and Styletto, and Urban Decay's XXL Shine Lip Gloss
Face: Urban Decay Face Primer, Mac Cream concealer, Urban Decay's Cream to Powder Foundation in Dream, Loreal's True Match Powder and Blush, and Urban Decay's Blotting Powder
EYES
Take a wet MAC 239 and pack on Empress (a rich royal purple) from your inner eye to a bit beyond the middle of your eye. Pack on tight to create a rich purple color, because the black is gonna blend into it, so make sure that your brush is wet to get a richer color! Next take the same brush and dab it wet with Medusa (a blackened blue color) and from the middle, cover over a bit of Empress and wing out onto your face for a cat eyed (or dragon eyed if you will) feel. Take a MAC 228 and gently grab some more Empress and blend the line you created with Empress and Medusa gently blend into the Medusa so it looks as if your fading the purple into the black. I also use this same brush to bring the Medusa into my crease, blending lightly into my inner corner of my eye. Once finished, I gently touch up the areas around Medusa so it looks streamlined, I use a nude (skin colored) eye shadow and my MAC 228 brush and just lightly touch up the areas that I want shaped into the Dragon Eye. From there, I still use the 228 and I pat on more Empress so the color can pop more. Don't over do it, you just want to brighten the color. I then put a thin line of black eyeliner on upper and lower lids, and a coat of mascara and I have my Dragon eyes.
FACE
I prime my face with foundation primer from Urban Decay, and start concealing, because I have dark blue circles under my eyes and Medusa pops it out. From there I apply my Cream to Powder foundation, and apply blush, I try to keep my face neutral so its not distracting from the eye shadow.
LIPS
With my lips, I line them with a shade of lilac pencil I got in this kit for Christmas (those kits from Walmart!) and put on Airborne Unicorn. With a lip brush, I apply Syletto to my lower lip dabbing the black into the purple, then I mix the color, until I get a dark purple color (didn't show in the picture but you get the idea). There I applied my UD XXL Shine lip gloss to contain the color!
And Viola! You now look like a dragon reminiscent of Maleficent herself.
My outfit consisted of Dark Wash Skinny Jeans, a Mystic Spiral Trent Lane shirt I had received for Christmas from Hot Topic, a Dark fuchsia tank top underneath, and some boots from Hot Topic!
Mystic Spiral is so dragon! I love them!
Much Love,
The Oracle of Dreams
Tuesday, April 6, 2010
How to Train Your Dragon Review
I'll have to say, I loved this movie, it was a beautiful story about acceptance, learning, and not everything is written in stone. This movie is about a boy name Hiccup (don't ask, its something about how if you have an ugly name it'll put fear into your enemies) who is a Viking, where they have interesting pests, and not bugs or rats, but Dragons.
Here Hiccup is the odd ball out, he does not fit in with his other Viking brethren and he's more of a thinker than a fighter, and he really wants to be seen as a full fledged Viking. Through the movie, he realizes that he should accept the fact that he really is a thinker, and that dragons are not all they are cracked up to be.
Completely honest, this movie had me on the floor laughing, because Toothless' movement was very reminiscent of a ferret. His mannerisms, his movement, and the way he bobbed his head all reminded me of my baby Dagger. Again, if you own a ferret, you'll understand this amusement. By the end of the movie, I was itching to pick up my baby and just snuggle his tiny body, because I just missed holding him. Dork I know!
The movie had a good many laughs, lots of jokes for adults, and an eye catching 3-D spectacular show! I love this movie and will buy it when it comes out.
If you're a person who loves the fantastic, the bold and beautiful, you'll love this movie. Children especially love this movie!
Overall Rating: A
Much love,
The Oracle of Dreams
Monday, April 5, 2010
Some Updatedness
Sorry I haven't written in a while, I'm still trying to get things sorted out on what I need to do with this blog, and what I need to do with my life so on and so forth.
Having two jobs, a boyfriend that needs attention and time to relax, it’s hard for me to find the time to sit down and do all I need to do for my life, blog, and sanity. Right now, my eye won't stop twitching and its very quite annoying!
Right now, my HobbyLobby duties are taking quite a lot of time, as we're making about $5,000 in frame sales a week, and at then end of this week, we have 12 shadowbox jerseys to make, and in the middle of next week, we have a 17 11x14 frames to make with everything in it. Busy, busy couple of weeks, it has been so bad, we've been about three weeks off from our due date, and customers have been really annoyed by this, but poo to them!
Subbing has picked up, and the classes have been so boring, that I've seen 5 movies for the past week! I almost want to teach these classes as opposed to me falling asleep halfway through class cause of no lights. I feel so guilty playing puzzle games while the kids watch the movie, but if I don't, I fall asleep! The kids are great, especially at
As far as movies go, I have seen movies and I do have pictures, and I'll give my two cents on the movies, and possibly a calendar of movies I DO want to see, so you guys can get an idea of what I'll be seeing and that way you can set your calendars (if you wish) so you can see what I have to say about the movie! Movies I have seen in the past are:
Recently I went to Comicpalooza here in
Last but not least, I do have makeup pictures and I do have makeup ideas to share with you all, and I’ll get to those as soon as I can!
Much Love!
The Oracle of Dreams
Monday, March 8, 2010
Alice in Wonderland and the Red Queen Makeup!
Ok, on now to the movie of the week, Alice in Wonderland!
I went with my sister and boyfriend to see Tim Burton's Alice in Wonderland. I've been a Tim Burton fan for as long as I could remember, when my mother took me to see Edward Scissor Hands a long time ago. I was hooked. Black and White were my staple colors, due to his themes of Heroes living in a Black and White world, while the dream, the better life was always in bold pastels. I loved his world, and my love for him grew even further with his well written masterpiece A Nightmare Before Christmas. I own almost all of his movies, even the Batman's, I love this director, and was not disappointed when I saw Alice in Wonderland.
First and foremost, this is not the original Alice, this is a story that takes place after Alice's first visit, memorialized in the Original Disney classic. But where the books and the First movie took place, Mr. Burton took the movie to a whole new level, and based mostly on a blend of the second book with bits and pieces of the first.
For those who are not familiar with Through the Looking Glass, this was Alice's second visit to Wonderland, where she walks into the world through a mirror and come across chess pieces who are about to play a game of chess. The White Queen is distraught, because she feels her daughter Lily is too young to be in the game, so she employs Alice to be a pawn, and directs Alice to move on the giant checkerboard. There she meets Tweedle Dee and Tweedle Dum, The White Knight, Humpty Dumpty among others where she realizes that the Whites have won the Game. There she's invited to a dinner party where she was made Queen Alice, and wakes up back in her study.
True to Tim Burton fashion, Alice is now 18, still mischievous, with little regard to wearing a corset nor stockings. Her world is literally made of gray, where she's the only person ready to stand out in blue. When she follows the white rabbit down the rabbit hole, the whole of Wonderland is bright colorful and vibrant, much happier than her drab Victorian world. There, this story takes a different turn, making it into something that even I wasn't expecting. Being an avid Alice in Wonderland fan, I spent much of my time reading these two books when I was younger, only to be astounded at the direction Tim Burton took to make this movie. The characters were amazing, the voice actors astounding, and if I could see it in 3D I would, but as of now, I'm unable to. I do recommend this to all who love the Alice series, avid movie goers, and children of all ages, this is one movie that you just seem to enjoy over and over again!
On to my costume. I spent hours upon hours at school, HobbyLobby and in my free time, deciding on what I should wear to this premier. Even though I could have seen the midnight showing, I would have gone alone and been bored all night! So, I wanted to keep this simple, but with time constraints, my idea of wearing a skirt was put out of my mind due to the fact that my legs were deemed too unsightly due to the long winter months of pant wearing! So, I went with simple, wearing a top I purchased from Cindie's, curled my hair, and some skinny jeans with boots from Hot Topic.
Makeup
Eyes: Lime Crime's Siren, Mirror Mirror and Fairy Wings Magic Dusts, Black Eye/Lip liner by Hot Topic, Fake Eyelashes purchased from a Halloween Store (it has purple tinsel on it!!!), and Urban Decay's Liquid Liner in Perversion
Lips: Lime Crime's Centrifuchsia Lipstick, Fairy Wings Magic Dust, Hot Topic Lip Eye/Lip liner in Magenta
Face: Lime Crime's Siren and Fairy Wings Magic Dusts, and Hot Topic Eye/Lip liner in Black
First, I started off with a good layer of Urban Decay's Primer Potion. Then I took Urban Decay's Liquid Liner and applied a thin line right on top of my eyes. Then applied the fake eyelashes on, due to the fact that I'm a bit messy applying these things on, and its easier in the long run for me to apply them first! After you have your eyelashes situated, I then applied Siren with a MAC 239 brush, wet the brush a bit, and patted on the color (there will be some fall off so be prepared and its okay to cover the black liner, its use was with the application of the false eyelashes). Pat the color into the crease without going over, and into the inner and outer corners following the shape of your eye. If you need to use a smaller brush for the inner and outer corners of your Eye I recommend the MAC 213 Pencil brush for that job! Then with a MAC 228 or your finger, I applied a sheer layer of Fairy Wings on the brow bone and into the crease. With the same brush, I then blended the two colors together, bringing just a hint of Siren above the crease onto the brow bone. Not TOO much just a small hint of that dark color. Then with a MAC 269 or any large angled brush, wet, I applied a layer of Mirror Mirror as my eye liner. I did a double line for a good thick look, and did the same with the lower eyelash line. In hard to reach corners, I used a MAC 208 or any small (teeny tiny) angled brush to bring the color all the way around.
the second time, so here's a look at the bright pinky color!
On my face you will notice that I have a heart, and on the other side I have a diamond. First and foremost, put on your concealer and foundation first before putting on the hearts and diamonds! Once finished with that, pat on a thin layer of Primer Potion (thankfully it dries sheer to non existent!) and with a SHARPENED eye pencil, or a gel liner shaped like a pen, draw on your heart and diamond. Practice makes perfect, so be sure you like your shape, if not, take a small sponge or cotton ball of makeup remover, remove the section your are coloring, reapply concealer and foundation and primer, and start again! Be careful, because you can reapply a whole side of makeup if you mess it up! Once you're happy with the shape, take a very small brush, I used MAC 228 and 213 and colored in the heart and the diamond with siren, and in the middle added a hint of Fairy Wings! Once finished, apply powder and a hint of blush on your apples of your cheek and avoid smearing your new heart and diamond! I was going to add a Spade and Club and color with Mirror Mirror but my face was getting crowded, so I decided against it. Try it and see, may be you'll like it!
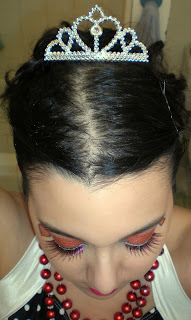
Do your hair as you please, and make sure you add your tiara, or you won't look queenly for the impromptu unbirthday tea party!
With warmest regards, and be sure to keep your heads!
The Oracle of Dreams
Thursday, February 18, 2010
Lime Crime's Candyfuture Lipstick Collection
I was enamored by her photos, and the way she took on different persona's in the photography. I was also enamored by her makeup. I had always been into makeup but I was too afraid to try anything bright or out there for fear of others laughing at me, and she captivated me to no extent. I then noticed her referring to a makeup company called Lime Crime Makeup. I was quite intrigued because each color was very bright, and it rivaled my long time love Urban Decay (I had a love hate relationship with Urban Decay, because I tried to get those bold colors on my olive skin tone, and it would take me several applications to get that color).
Upon asking her several questions regarding the company, I had decided to go ahead and purchase several colors, those being limited edition colors that I had no clue how to use, due to the fact that they were pigments, and I was used to pressed eye-shadows. So off to the interwebs I went, and found the Blog of the creator Xenia, or better known as Doe Deere and her Blogazine. I found so many makeup tutorials, articles on life, and inspirations, I was hooked! I had finally found a place where it was alright to be a beginner in makeup application and not feel ashamed. Shortly there after, I became a fan of Youtube Videos that regarded similar help.
I started buying her colors, completely impressed with all the impact, and started mixing these colors with urban decay's and was just in color heaven! My boyfriend noticed a direct confidence change to the point that I was wearing my Pirate Coat to a Harry Potter premiere with my Voldemort wand in my boot! My wardrobe even changed to more colorful (and less cartoony) representation of who I was. I was a different person, and definitely for the better.
Great Pink Planet
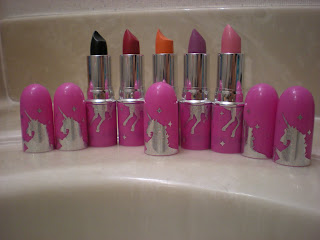
When her CandyFuture Lipsticks came out, I was seriously in need of a lipstick makeover, since the only color I wore was Clinique's Tenderheart, and enjoyed it for the fact that it matched my lip color to a T. That was pretty much it, I was too afraid to take my lips to the next level like I did with my eyes, but then I saw it, a color I have worshiped since the day I was born. A color that has stormed my closet, and accessories for years, a color that I had wanted for my Quincenera, but my mother told me no. It was a beautiful orange lipstick named My Beautiful Rocket! I HAD to buy it, and since Halloween was coming up, I decided to buy Syletto, a beautiful opaque black lipstick! Several months later, thinking I needed some softer colors on my lipstick pallet, I then purchased three more lipsticks: Airborne Unicorn, Great Pink Planet, and Centrifuchsia. And these colors astounded me!
Centrifuchsia is described as "Fuchsia, amplified to a cosmic degree!" This picture does not do the color justice. On my warm skin tone, this is a great out there color. Comes off even deeper than the picture shown and the one on the website! I love this color, and purchased it to be an everyday wear (because most colors come off lighter on my skin tone), and I was so wrong. I think I've worn it out when I'm not at school subbing, or at HobbyLobby, and I've gotten so many compliments on it! Its very creamy, smells great, and the color applies evenly and so bold! I'm not the greatest lipstick applicator, and I do end up smudging it (as seen above) but I do love this color, and I'm working on an 80's throwback shoot with this color. This is for those who want that great 80's neon color, or for a seductive pout.
Great Pink Planet is described as "Bright pastel pink; think strawberry milkshake in a tube." It is true, I did think of it as strawberry milkshakes, and I wanted to taste the strawberry. It is bright, but on medium toned skin, it washes out, and looks like a normal lip color. Then again, on my fair colored friend, she walked around HobbyLobby proclaiming that she was the Milkshake Goddess! So it really depends on your lip color. I have though, mixed this with Airborne Unicorn, and came to get a great pinky purple lip color that reminded me of that purple color from Cat In the Hat! Overall, it was even, but shown was over lip balm, and it wasn't staying very well, but not all lip colors work like others. I'm not a big fan of the pink on me, but I do use it when I need a very neutral/mild lip tone. Great for those who love Strawberry Shortcake!
Syletto is described as "Luscious, creamy black that gives you 100% coverage right out of the tube!" And that is the truth. It does come off a nice creamy black (the image does not do it justice!) and is probably the hardest lipstick to own. I always keep smudging it over my lips (as viewed above) and even though it is a long lasting lip color, you do have to re apply every now and then because of smudging! I love this color due to the fact that there is a black out there that you don't have to put 10,000 layers on to get that color! Its one swipe of inky black and you're done. Unless you're me, and end up smudging the whole thing! Aside from that, this is great with gloss, but then again, I think my gloss might be too thick for the pigment due to the fact it does run off! I do reccomend using a black lip/eye liner for the job (I use Hot Topic's lip/eye pencils for the color and their wear!).
Hope this helps in choosing some of LimeCrime's lipsticks! Until I get a new camera, I'll post better images!
With the Warmest Regards,
The Oracle of Dreams
Wednesday, February 17, 2010
Airborne Unicorn and the Great for Work Style!
- I'm a Substitute Teacher, with the hopes of one day becoming a full blown teacher! w00t!
- I love high impact color cosmetics, and try to blend them in to everyday wear, especially when I go to school and work, even though I'm a terrible beginner!
- I like making lists!
and lighting
First take Lime Crime's Magic Dust in Diva (which is a nice coppery pigment) and dust it from the inner corner of your eye to the middle with a small brush (I used MAC 239). Then take Dragon Scales Magic Dust (which is this nice, terrecotta color, that applies red with green glitter) and dust it from the outer corner to the middle, and place a little bit into the crease (I used the MAC 219 Pencil Brush to outline the edges of the eye, and the 239 to fill in. I also used the 219 to blend into the crease). Now BLEND the two colors in the middle with a swirling motion, and continue to blend into the crease. I then follow the same patter on the lower lid with 219 again, connecting the two colors to the upper lid for a fluid look and blend in the middle. I then take my NYC eyeliner in Sable (always use brown for daytime looks, its softer and more work appropriate than Black!), and line my upper and lower lids with a thin line, not too thick or it gets too dark (Note! I prefer Using Wet n'Wild's eyeliner in Mink Brown as it applies smoother and darker than NYC personally. But it was the only brown eyeliner I have! >.< style="font-weight: bold;">Face:
I use MAC's Select Cover-Up concealer first, then I apply my CoverGirl trueblend whipped foundation in Buff Beig (level 2). After wards, I apply L'oreal True Match powder in Natural Beige W$ (its a bit darker than my natural skin tone, but it smooths to a natural color once its applied). Then I use the True Match Blush in Barely Blushing W4 for a natural face.
Lips:
I used Lime Crime Makeup's Candyfuture lipstick Airborne Unicorn which is supposed to be this nice creamy purple color and lined my lips with concealer to pop out the color. The color is bold, and applies smoothly from the tube, and it even smells good (though my boyfriend hates the smell and thinks cookies are being made!). I know that due to its high pigmentation, the color does stain your lips, which I do not have a problem with as I used to do stage work and many of my lippies stained my lips, to some people that is a downer. My one notation though, is that on fair skinned women (I tried it on my friend Holly who is fair with red hair) it does come out a nice creamy purple, on me, it either comes out neon purple (under florescent lighting), or a nice pink with purple tint (In natural or Incandescent Lighting). Now when I first put it on, I was really disappointed in the fact it was not a purple color and I was ready to toss it away when my mother looked at me and said "Oh great! You got a good color for you, it complements your skin tone and looks like your natural lip color!" What! So to see if what she said was true, I wore this look to work, and was complimented by the staff and students alike! Now its my staple color, and I do not leave home without it. Even at my part time job at Hobby Lobby, I got many compliments from my co-workers, management, and customers (especially the nice old ladies! Men didn't seem to like it though!).
I do recommend buying Airborne Unicorn if you have my coloration for a nice work appropriate attire, otherwise the color will come out a creamy purple, but hey! either way it is still pretty!
I'll post other tutorials on different work appropriate makeup with bright pigments. Now off to do other things that do not involve blogging! More tomorrow on my other Lime Crime's Lipsticks!
Tuesday, February 16, 2010
My Victorian Hat!
Woo-hoo! For my first How-TO! I spent lots of time working on art pieces and jewelry making, that I sometimes forget that I make accessories and hats! I have others I've made for the past Renaissance Fair's and Halloweens, I do get a great challenge from creating something that means so much to me. So when I wanted to see The Wolfman I knew I needed to make somethings that look Victorian without repeating items from my past costumes there for I made a hat and broach.
I know, I could have gone to a vintage store and purchased something that emulated the effect I wanted, but I wanted to create something that I knew I would use over and over again (some of my vintage items would only get used once, then I'd never use them again). I had made a hat in an original design for an Amanda Palmer concert, but gave it to one of the sisters of Vermilion Lies, because her outfit matched it! I missed that hat, so I made another!
- Felt Hat purchased from a craft store
- High bonding adhesive glue that is good for fabric, glass and plastic! I recommend E-6000!
- An old or new bow-tie (you can purchase these at Hobby Lobby), or you can use about 1/2 inch to 1 inch ribbon if you wish!
- Plastic hair comb, this can be purchased at a craft store or you can detach one from those cheap plastic princess tiaras
- A button styled pin for the broach
- Your choice of jewelry for the broach and hat!
- First grab the bow-tie and the hat. Wrap the bow-tie around the base of the hat to were the bow over laps a part of the strap and trim. (Note: If you're using ribbon, measure one piece around the base of the hat and overlap about an inch. Then make a bow with a separate length of the same ribbon.)
- Wrap the newly cut bow tie around the hat again, decide how you want the bow placed on the hat, and then with the end of the strap, glue the end piece on the hat. Once glued, take the bow part and wrap it around the hat and glue the bow down with the strap is tight. A loose hatband will make the end product look sloppy. Hold down the bow and glued end to the hat for several minutes to make sure it dries and does not seperate. (Note: If you're using ribbon, make sure the first length of ribbon is tight around the hat band glue to the hat. Then with the bow, glue right on top of the glued edges.)
- To make sure that the bow-tie is secure, sew the loop for the bow-tie to the hat itself with black thread. (Note: You don't have to do this if you're using ribbon.)
- Make sure you know how you want the bow to be placed on the hat so when you place the plastic comb on, it will be placed on your head accordingly. Take the plastic comb and glue and/or sew it in. If you do sew it it make sure you use black thread again, and sew the thick band, and several of the combs teeth to prevent the comb from moving when wearing the hat! If you're gluing, you need to hold down the places you glued the comb to prevent it from moving, use clothes pins or a similar item to hold in place.
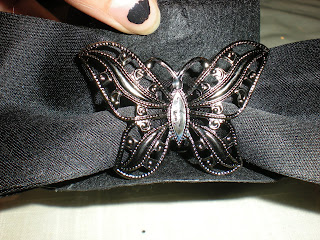
- Whatever jewelry you choose to place on the hat glue it to the center of the bow. I chose a pewter butterfly from Hobby Lobby.
- When making the broach, I used a little snippet from the bow-tie, glued another butterfly onto the piece of bow-tie, and glued all that to a pin. Voila! A butterfly broach!
With The Warmest Regards,
The Oracle of Dreams