Woo-hoo! For my first How-TO! I spent lots of time working on art pieces and jewelry making, that I sometimes forget that I make accessories and hats! I have others I've made for the past Renaissance Fair's and Halloweens, I do get a great challenge from creating something that means so much to me. So when I wanted to see The Wolfman I knew I needed to make somethings that look Victorian without repeating items from my past costumes there for I made a hat and broach.
I know, I could have gone to a vintage store and purchased something that emulated the effect I wanted, but I wanted to create something that I knew I would use over and over again (some of my vintage items would only get used once, then I'd never use them again). I had made a hat in an original design for an Amanda Palmer concert, but gave it to one of the sisters of Vermilion Lies, because her outfit matched it! I missed that hat, so I made another!
- Felt Hat purchased from a craft store
- High bonding adhesive glue that is good for fabric, glass and plastic! I recommend E-6000!
- An old or new bow-tie (you can purchase these at Hobby Lobby), or you can use about 1/2 inch to 1 inch ribbon if you wish!
- Plastic hair comb, this can be purchased at a craft store or you can detach one from those cheap plastic princess tiaras
- A button styled pin for the broach
- Your choice of jewelry for the broach and hat!

- First grab the bow-tie and the hat. Wrap the bow-tie around the base of the hat to were the bow over laps a part of the strap and trim. (Note: If you're using ribbon, measure one piece around the base of the hat and overlap about an inch. Then make a bow with a separate length of the same ribbon.)
- Wrap the newly cut bow tie around the hat again, decide how you want the bow placed on the hat, and then with the end of the strap, glue the end piece on the hat. Once glued, take the bow part and wrap it around the hat and glue the bow down with the strap is tight. A loose hatband will make the end product look sloppy. Hold down the bow and glued end to the hat for several minutes to make sure it dries and does not seperate. (Note: If you're using ribbon, make sure the first length of ribbon is tight around the hat band glue to the hat. Then with the bow, glue right on top of the glued edges.)
- To make sure that the bow-tie is secure, sew the loop for the bow-tie to the hat itself with black thread. (Note: You don't have to do this if you're using ribbon.)
- Make sure you know how you want the bow to be placed on the hat so when you place the plastic comb on, it will be placed on your head accordingly. Take the plastic comb and glue and/or sew it in. If you do sew it it make sure you use black thread again, and sew the thick band, and several of the combs teeth to prevent the comb from moving when wearing the hat! If you're gluing, you need to hold down the places you glued the comb to prevent it from moving, use clothes pins or a similar item to hold in place.
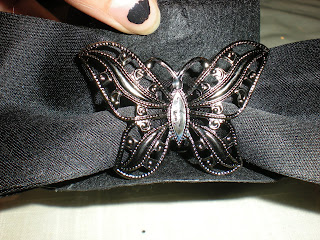
- Whatever jewelry you choose to place on the hat glue it to the center of the bow. I chose a pewter butterfly from Hobby Lobby.
- When making the broach, I used a little snippet from the bow-tie, glued another butterfly onto the piece of bow-tie, and glued all that to a pin. Voila! A butterfly broach!


With The Warmest Regards,
The Oracle of Dreams


No comments:
Post a Comment